
Studio Look Without a Studio: Pro Photos from a Phone
October 28, 2026 · Dealer Guides
The studio look is a system of spot, hour, settings and sequence, not an expensive camera. This guide shows how a phone produces listing-ready car photos, and where hand editing closes the remaining gaps.
Key takeaways
- The spot decides the ceiling of quality
- Shoot the set, not the moment
- Phones cannot fix mixed light or clutter
- Five cars an hour with one routine
Yes, you can take car photos with a phone that look close to studio work, and most dealers already own everything required. The studio look does not come from the camera. It comes from controlling four things the studio controls for you: the spot, the light, the settings, and the shooting sequence, and then letting a car photo editing service do the hand editing for the background, exposure and color work a phone cannot finish on its own. This guide gives you the complete workflow, step by step, including the honest limits of a phone and exactly which gaps editing closes.
That matters because the phone is now the default camera of the used car business. The salesperson who takes the trade-in photographs it. The lot attendant photographs it. Very few dealerships outside the largest groups have a photo bay, a turntable, or a dedicated photographer, and yet their listings sit on the same search results page as the groups that do. Buyers do not grade on a curve. A listing photographed badly on a phone loses the click to a listing photographed well on a phone, and the difference between the two is rarely the handset. It is the routine behind it.
The studio look is a system, not a camera
Before the workflow, one idea is worth fixing in place, because everything else follows from it. When buyers describe a listing as looking professional, they are responding to a short list of visible qualities: the car fills the frame the same way in every photo, the background is calm and identical across the set, the paint color looks true, the light is even with no black shadows or blown white panels, and nothing in the frame competes with the vehicle. A studio produces those qualities with architecture. You will produce them with discipline at the shooting end and hand editing at the finishing end. Neither half works alone. Great editing cannot rescue a photo taken from the wrong distance in mixed light, and a careful photographer cannot remove the cluttered lot behind the car. The system is the two halves together.
Step one: choose the spot, because the spot decides the ceiling
The spot decides more about car photos with a phone than the phone itself ever will, so treat finding it as a one-time investment rather than a daily improvisation. Walk your own lot as a photographer, not as a dealer. You are looking for the plainest available backdrop: a clean wall, a hedge line, an empty stretch of fence, or the open edge of the lot where the background falls away to sky and distance. What you want behind the car is whatever is least interesting on your premises. Avoid the showroom glass, which reflects everything and doubles every distraction. Avoid parking the car where other vehicles crowd the frame at the edges. Avoid painted lot lines running under the car at odd angles where you can, because the eye reads them as sloppiness.
Once you find the spot, formalize it. Photograph every car in the same place, from the same marked positions, and the set consistency that buyers read as professionalism starts before a single setting is touched. If the spot allows it, keep enough room to walk a full circle around the car without stepping into traffic or shadow. If your lot genuinely has no calm corner, do not despair and do not fake one: this is precisely the situation car background replacement exists for, and a consistent shot taken against an honest cluttered background edits far better than a chaotic shot taken while hunting for a backdrop that is not there.
Step two: choose the hour, because light is the real studio
Studios are, at heart, machines for controlling light, and the hour you choose is your version of that machine. The most forgiving light of the day for car photos with a phone falls in the morning and late afternoon, when the sun is low enough to model the car's panels without burning them. Overcast days, which dealers tend to curse, are quietly excellent: cloud cover works like the softbox in a studio, spreading light evenly and calming reflections. The dangerous window is harsh midday sun, especially in summer. It splits the car into white-hot panels and pitch-black shadow, and a phone sensor, which has far less dynamic range than a dedicated camera, cannot hold both ends at once.
Build the hour into the routine rather than leaving it to chance. Photograph arrivals in a fixed daily window, and park the cars nose-out in the right orientation the night before if your process allows it. If a car must be photographed at midday, use the building's shade: park the whole car in open shade, where the light is even, rather than half in sun and half out, which is the single worst lighting arrangement a listing photo can have. Consistency of hour matters almost as much as quality of hour, because a set shot across one soft morning reads as one session, while a set shot across three different lights reads as three different cars.
Phone shot given a studio backdrop: hover or drag to compare
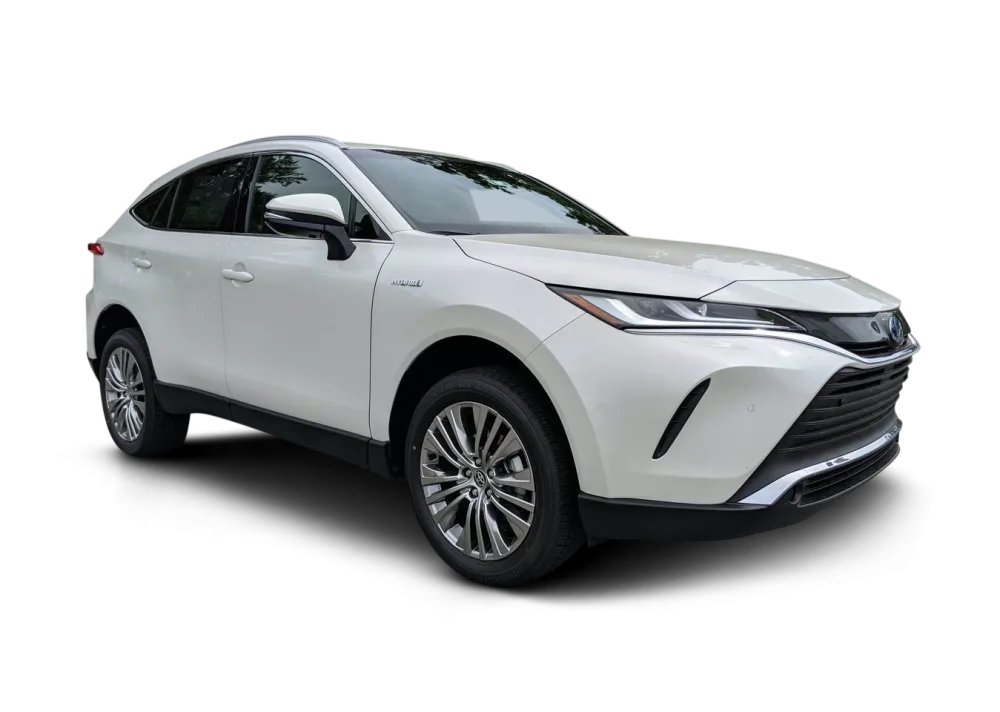
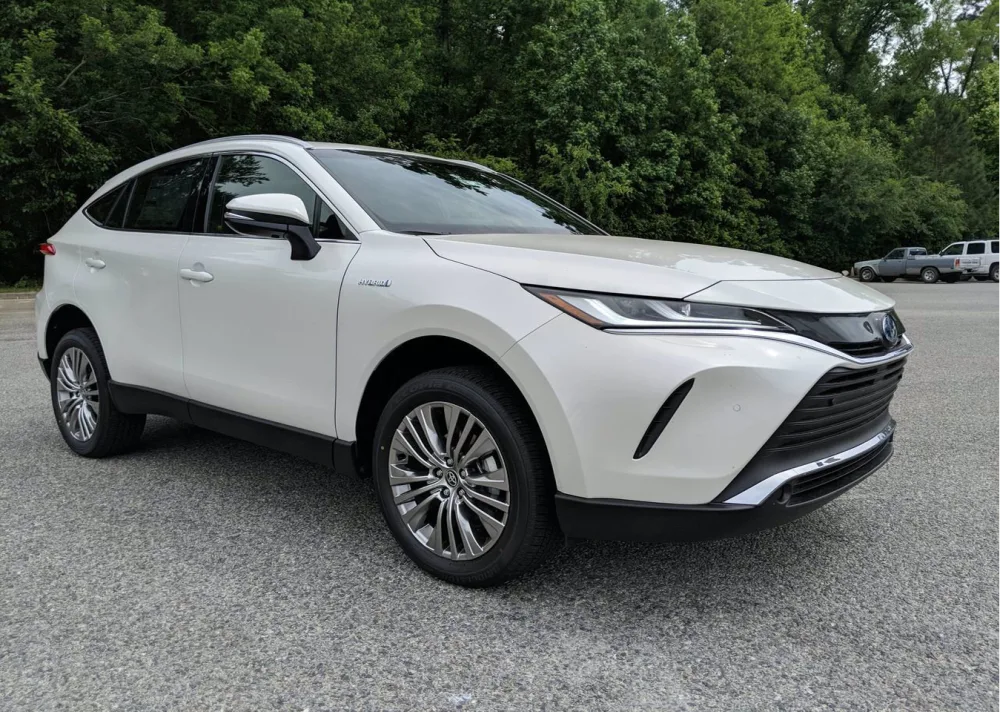 BEFORE
AFTER
Drag the slider or move your mouse over the image to compare.
The phone settings that actually matter
Phone cameras are designed to make decisions for you, and for listing work you need to take a few of those decisions back. None of this requires a special app. It requires five minutes in the settings you already have.
Use the main lens, the standard wide lens, for almost everything. The ultra-wide lens on most phones bends straight lines near the frame edges, and a car is nothing but straight lines: the roofline bows, the wheels lean, and the vehicle looks subtly wrong in a way buyers feel but cannot name. The telephoto lens, if your phone has one, is genuinely useful for detail shots from a respectful distance. Digital zoom is not a lens at all; it is a crop performed early and badly, so walk closer instead.
Turn the grid on and leave it on. The grid is what keeps horizons level and cars upright, and a listing set with drifting horizons looks amateur no matter how clean the cars are. Level the car in the frame at the moment of shooting, because straightening later crops away resolution you may want.
Lock your exposure and focus. On most phones this is a long press on the subject, or a dedicated lock control. Without the lock, the phone re-meters every frame as you walk around the car, so the same silver paint renders bright in one photo and grey in the next, and the set stops agreeing with itself. Tap on the car's bodywork, not the sky and not the glass, let the exposure settle, lock it, and shoot the whole exterior circuit at that setting. This one habit does more for set consistency than any other single change.
Understand what HDR is doing. High dynamic range mode blends several exposures to rescue shadows and highlights, which sounds ideal for cars, and often is. But aggressive HDR can flatten the reflections that make paint look deep and can leave odd halos around rooflines against bright sky. The practical rule: leave HDR on for interiors and shaded work, test it against a bright sky exterior, and if your phone's version looks washed out, turn it off for exteriors and rely on your chosen hour instead.
Choose your file format with the editing in mind. If your phone offers a high-efficiency format, know that it squeezes files harder; the full-quality standard format gives an editor more to work with, especially in shadow detail. Shoot at the phone's full resolution, never at a reduced messaging size, and never photograph the car through a messaging app's camera, which compresses the image before it ever reaches you. Finally, clean the lens. It sounds beneath a professional guide, but a phone lives in a pocket, and a fingerprint haze across the lens softens every photo and blooms every highlight. A two-second wipe with a soft cloth is the cheapest image-quality upgrade in this entire article.
The walk-around sequence: shoot the set, not the moment
Amateur car photos with a phone fail in a predictable way: the photographer walks around the car taking whatever looks good, and the finished listing has three front three-quarter shots, no rear view, and nothing of the driver's seat. Professional sets are boring in the best sense. They follow the same sequence every time, so every listing answers the same buyer questions in the same order.
Run the circuit in a fixed order. Start with the front three-quarter hero shot, the one that will carry the search results page. Then the straight front, the side profile, the rear three-quarter, and the straight rear. Move inside in the same order a buyer would explore: the driver's seat and wheel, the dashboard and infotainment screen lit and awake, the front passenger area, the rear seats, and the boot or cargo space with the seats in their normal position. Finish with the details that close sales and prevent arguments: each wheel and tyre, the odometer reading, any engine bay shot your market expects, and the service history and keys if you photograph them.
Two rules make the sequence work. First, shoot more than you will publish, because deleting a spare frame costs nothing and re-shooting a car that has moved or sold costs a trip. Second, never break the circuit to chase a pretty angle. The sequence is what makes five listings from five different salespeople feel like one dealership, and it is what makes the editing stage fast, because the editor receives the same anatomy every time and can apply your standard without guessing what your set usually contains.
Distance and height discipline: where phone photos quietly go wrong
If one technical habit separates phone photos that look professional from phone photos that do not, it is this one. Phone photographers stand too close. A phone's main lens, used at arm's length from a front bumper, stretches the near end of the car and shrinks the far end, so the vehicle looks nose-heavy and slightly cartoonish. Step back. Photograph the car from farther away and let it occupy the middle of the frame with a margin around it. The perspective flattens into honesty, the car's proportions read true, and the margin gives the editing stage room to crop and size the final image precisely, which is where car image resizing turns one good master photo into the exact dimensions every marketplace demands.
Height matters the same way. Hold the phone at roughly the height of the car's window line for exterior shots, neither towering above the roof nor crouching at the bumper, unless a specific shot calls for it. Keep that height constant around the whole circuit. A set where the camera height wanders reads as restless and unplanned, while a set at one calm height reads as a single deliberate session, which is the entire illusion a studio sells. Inside the car, brace the phone against the door frame or headrest for stability, keep it level, and let the dashboard lights and screen be switched on, because a dark cabin photographed dead looks like a car that does not start.
What a phone genuinely cannot fix
Honesty is due here, because the rest of this guide only works if you know where the phone's authority ends. There are three problems no setting, app, or shooting trick on the phone itself will solve.
The first is mixed light. A car parked half under a canopy with sun striking the rear panels presents two different colors of light in one frame: warm sunlight and cool shade. Phone sensors must pick one balance, so half the car renders orange or the other half renders blue. You prevent most of this at the spot and hour stage, by parking the whole car in one kind of light, but when the lot gives you no choice, the phone alone cannot separate what the light has mixed.
The second is the cluttered background. Signage, other stock, bins, fencing, a passing truck: the phone records all of it faithfully, and no in-phone portrait trick handles a full vehicle responsibly. Blurring modes designed for people smear wheels, mirrors, and rooflines, and buyers can see the smear. A background behind a car is an editing problem, not a camera feature.
The third is harsh contrast beyond the sensor's range. On a bright day, a black car in full sun asks the sensor to hold detail in near-black paint and a glaring sky at the same time. Something must give: either the paint becomes a featureless slab or the sky becomes white paper. Choosing the hour shrinks this problem enormously. It does not delete it, because dealer life does not always wait for soft light.
Phone photo colour, professionally corrected: hover or drag to compare
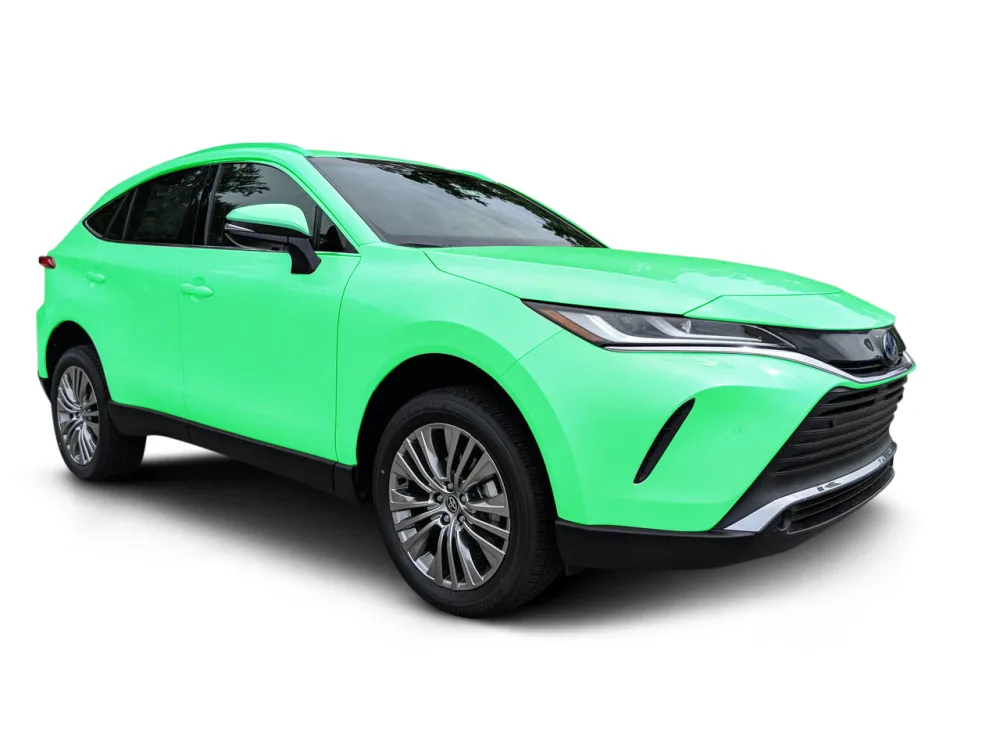
 BEFORE
AFTER
Drag the slider or move your mouse over the image to compare.
How hand editing closes exactly those gaps
Notice that the three problems above are all finishing problems, and finishing is what car photography editing is for. This is the division of labor the studio-look system runs on: the phone and the photographer capture a true, disciplined record of the car, and a human editor completes the work that capture cannot.
Mixed light and uneven exposure are corrected panel by panel with car lighting correction, where an editor balances the bright and dark ends of the frame and evens the color of light across the car, rather than applying one global filter that fixes the bonnet and ruins the door. True paint color, the thing buyers will check first when they see the car in person, is restored with car color correction, because a phone's automatic white balance guesses, and it guesses differently under every sky. The cluttered lot disappears entirely under background replacement, which lifts the car cleanly off your forecourt and sets it on the calm, consistent scene your whole inventory shares. The small honesty-preserving cleanup of the car itself, dust on the sills, water spots, a distracting reflection in the glass, the valeting misses you only notice on a big screen, is the work of a car retouching service, done with restraint, because the finished photo must still be the car you are selling.
One boundary is worth stating in an article about making phone photos look better than the moment they were taken. Editing at Cars Photo Editor is done by hand, by editors, with no AI tools in the process, and the rule on every image is the same: the setting can be improved without limit, the car itself essentially not at all. Damage is never removed, specification is never altered, and color is corrected toward the truth, not away from it. That boundary is what keeps a better-looking listing an honest one, and it protects the dealer when the buyer compares the photo with the vehicle on the lot.
A realistic before and after for phone originals
Dealers testing this workflow for the first time often ask what level of transformation to expect, so here is the honest version. A disciplined phone original, right spot, right hour, locked exposure, full circuit, edits into a listing photo that most buyers cannot distinguish from a studio set at the sizes listings are actually viewed. The background becomes your standard scene, the exposure evens out, the paint reads true, and the set agrees with itself from the hero shot to the boot. That is the realistic ceiling, and it is high.
What editing cannot do is manufacture information the phone never captured. A photo taken at arm's length will keep its stretched proportions. A frame shot in near darkness will keep its noise. A missed shot stays missed; no editor can invent the rear three-quarter view of a car that has been delivered. This is why the workflow spends so much of its length on shooting discipline. The better the original, the less heroic the editing needs to be, and the faster and cheaper the whole system runs. Phone originals that follow the routine are, in our daily experience, entirely sufficient for front-line retail listings. Phone originals that ignore it are the ones that make dealers believe they need a studio.
The one-hour routine: five cars, one salesperson
A workflow that only works on a quiet Tuesday is not a workflow, so here is the batch version, built for the way inventory actually arrives. Five cars in an hour is twelve minutes a car, and twelve minutes is enough if the routine is fixed and the cars are prepared before the camera comes out.
Stage the cars first. Line the five up in shooting order near your chosen spot, keys in a fixed place, each car washed or at least dry, windows up, wheels straightened, headrests even, and personal items and trade-in clutter out. Most failed photo sessions are failed staging sessions; the photography itself is the short part. Move car one into the spot and shoot the full circuit at your locked settings, using the same sequence every time so it becomes muscle memory. While the salesperson drives car one away and brings car two in, nothing is reviewed and nothing is deleted. Reviewing mid-batch breaks rhythm and invites the photographer to reshoot instead of progress. Shoot all five, then review all five at a desk or in the shade, zooming in on the hero shot and the dashboard shot of each, because those are the frames that carry and close the listing.
Send the batch for editing the same hour, named or ordered consistently, with one note covering anything unusual: a panel your photographer wants checked, a car whose color is easy to get wrong, a listing that needs the rush. A fixed routine like this is also what makes the editing stage predictable. Our standard is 24 hour car photo editing for typical dealer batches, so cars photographed this morning are listed, fully finished, tomorrow at the latest, without the dealership owning a single piece of studio equipment.
Quality gates: when a phone photo earns its place on a listing
The last piece of the system is a gate, because a workflow without a check eventually publishes a photo that should never have left the phone. Before any set goes live, run these checks on the finished photos, whoever edited them. Is the car level, complete in frame, and shot at one consistent height around the set. Does the paint color match the vehicle as it stands under your own lights. Does the background match the rest of your inventory, with the shadow sitting naturally under the car. Are the interior shots lit, level, and free of the photographer's reflection in the screen or glass. Is every published frame sharp at full size, with the odometer and detail shots readable. And does the set contain the full circuit, hero to boot, with nothing promised in the text that the photos quietly fail to show.
Any frame that fails gets one of two fates: reshoot it if the car is still with you, or drop it if it is not, because a missing detail shot costs far less than a bad one. Gates like these take under two minutes per car once they are a habit, and they are the difference between a dealership that uses phone photos and a dealership that is used by them.
What the system costs, and how to test it on your own cars
The shooting half of this system costs nothing but the discipline to run it. The editing half is priced per image, and the services this workflow leans on are the modest ones: background replacement at $0.69 per image, lighting and color correction at $0.39, retouching at $0.50, and resizing from $0.19, with volume discounts of 5 percent at 100 images and 10 percent at 500. Set against the cost of a photo bay, a camera kit, and the staff hours to run them, the arithmetic is not close, and set against the cost of listings that lose clicks to the dealer across town, it is not close either.
Do not take any of that on trust, from any car photo editing company, including ours. Cars Photo Editor has edited dealer photos by hand since 2016, for dealers and automotive photographers across the USA, the UK, and Europe, and our car photo editing free trial covers 5 to 10 of your own photos. Photograph one car twice: once the way your team shoots today, and once through the routine in this guide. Send the disciplined set, tell us it came from a phone, and judge the finished photos against the real car on your lot. That comparison, on your own inventory, is the only review of this workflow that should persuade you.
Studio look from your phone photos, free
Send us 5 to 10 of your own listing photos (files or a Drive or Dropbox link) and we will edit them free, by hand, so you can judge the quality on your own inventory before you spend anything.
Start Your Free TrialPhone car photography: common questions
Can you really take professional car photos with a phone?
Yes, provided the phone work is disciplined. The studio look comes from the spot, the hour, locked exposure, a fixed walk-around sequence and consistent camera height, finished by hand editing for background, light and color. The handset model matters far less than the routine.
What are the best phone settings for photographing cars?
Use the main lens rather than the ultra-wide, turn the grid on, lock focus and exposure on the bodywork, shoot at full resolution in the standard file format, and test HDR on bright exteriors since it can flatten paint reflections. And clean the lens before every session.
What can editing fix in phone car photos, and what can it not fix?
Hand editing can replace the background, balance mixed light and harsh contrast, correct paint color, and clean small distractions, and it can size the finished photo for every marketplace. It cannot fix stretched proportions from shooting too close, recover detail the sensor never captured in darkness, or invent a shot that was never taken.
How many photos should a car listing taken on a phone have?
Shoot the full circuit and publish a complete set: exterior angles, the interior from the driver's seat through the boot, and the detail shots buyers check, including wheels, dashboard and odometer. Shooting more than you publish costs nothing and protects you if a frame fails the quality check.